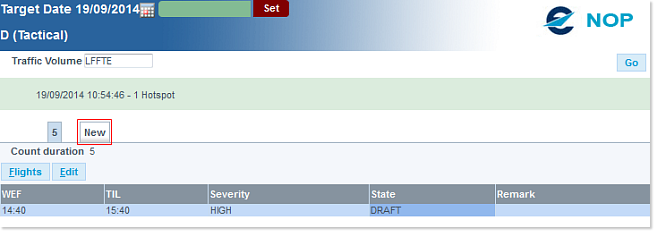
From the Hotspot Portlet, click on the New button:
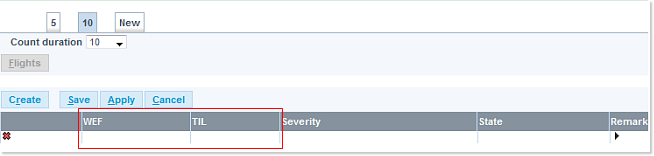
The Count duration selector appears, and well as a blank tab corresponding to the new item in creation:

In this example we have set the Count duration value to 10 - as reflected in the new tab. It is now time to click on the Create button:

A new blank entry is created in the Hotspot editor, yet missing two important WEF and TIL values:
These values will be extracted from the Occupancy Counts window:
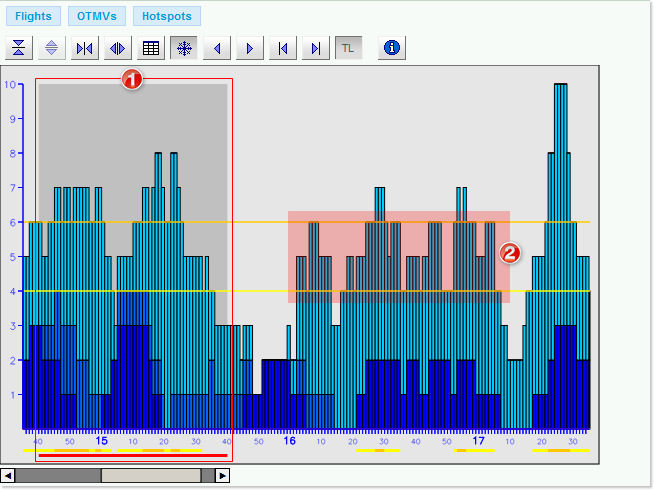
1 The already existing Hotspot (tab '5' in the above graphic)
2 The area where the Counts exceed the Peak (and Sustained) values as declared in the associated OTMV - suggesting us to use the 16:00 for the WEF value and 17:10 for the TIL value.
The next step is to determine the Severity, which can be selected from these values:
- LOW
- MEDIUM
- HIGH
The State (status) does also need to be specified, from one of the following values:
- DRAFT: the Hotspot is created, but is not visible on the Traffic Counts window. An orange line below the counts shows the hotspot period
- ACTIVE: the Hotspot is visible on the Traffic Counts window, and is visible to all users. The line below the counts turns to red.
- SOLVED: the implemented STAM measure solved the issue. The Hotspot is no longer visible, and the line below the counts has become green.
- ACCEPTABLE: no STAM measure was required during the Hotspot period. The Hotspot is no longer visible, and the line below the counts is now blue.
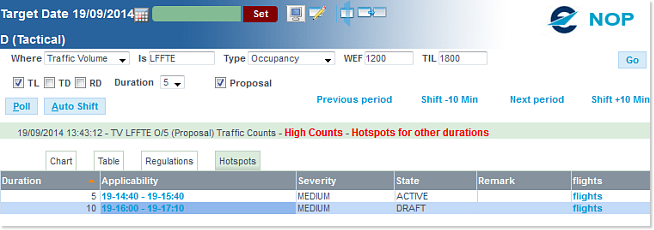
The resulting entry is here - with the following values:

- WEF = 16:00
- TIL = 17:10
- Severity = MEDIUM
- State = DRAFT
- The Remark field has been left empty.
The Hotspot has been effectively created, as reflected in the updated Traffic Counts Portlet:
Action Buttons
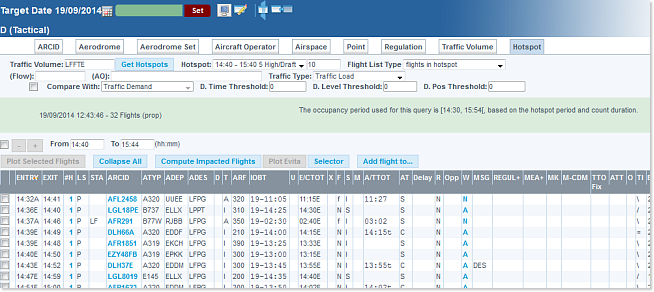
The Flights button opens a Flight List Detached View, with the Hotspot tab already selected, and pre filled with the current query parameters:
The Edit button reveals the Hotspot editor, where the following actions may be performed:

- Create: creates a new Hotspot (see above)
- Save: Saves the changes (be it a change or a creation) and closes the editor
- Apply: Saves the changes (be it a change or a creation)
- Cancel: terminates the current operation without saving changes
Note: More information about how to manage Hotspots can be obtained from this section - the screens may look slightly different as they refer to the NOP Desktop version of this feature, but the concept will be the same.