The view concept is at the very heart of the WIND. It allows you to create and manage any number of 'recordings' of actions, which are stored in identified working spaces called Views.
A view can therefore keep changes made to the Business tree or to the File resources tree, changes made to existing documents and of course newly created documents.
This allows you to use a given view to organize your work, create content and make all the necessary changes until the material is ready to be published. More importantly, it allows you to privately monitor how your changes would appear on the Portal, by generating a page mixing the actual NOP content and your own contribution.
Managing Views
As you initiate a WIND session and open the WIND Detail window to start working, this is how the header looks like:
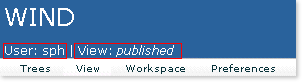
The User field tells with which account you are logged in to the Portal, and the View field indicates the currently set view - by default, it will be the published view, containing all the elements and structure of the published NOP (in other words, the Portal as it is seen by the public).
The View Menu
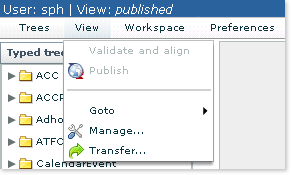
By default, the View menu proposes the commands as shown above, with the Validate and align and the Publish command greyed out (not available) since, by default, there is nothing new to validate or publish at this stage.
You can now either go to a previously created View, create or delete a view, or even transfer a view to someone else's account to allow that person to work on the changes you made.
The Goto command
In the below example, three views are proposed to you (you can have many more):
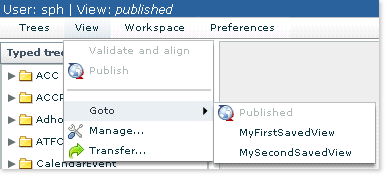
- Published - not available at this time since the selected view is already set to published
- MyFirstSavedView - a previously created view
- MySecondSavedView - another example
If you select, for example, the MyFirstSavedView to activate it, this is how the Goto options do look like:

As you can see, the active view is now MyFirstSavedView: it is displayed in the blue header and greyed out in the proposed Goto options.
The Manage Command
Clicking on the Manage command opens the View Manager:
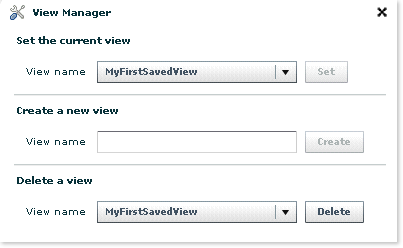
The View Manager allows you to set (select) an existing view, create a new one, or delete any of the views created using the account with which you are logged in:
- Set the Current View: select the desired view to activate from the drop down list and click on the Set button;
- Create a new view: type in the name of your choice for a new view and click on the Create button;
Because the name of a View can only contain alphanumeric character, any other keystroke (space bar, special character, ...) will be skipped by the system as you type in.
Caution: When you publish a view (this step is decribed in the Publish section), ALL ITS CONTENT is going live, regardless of its completion state. It is therefore recommended to name your views after the type of content or intended action (i.e. 'draft' 'forMonday', ...) and manage them carefully to avoid the unwanted publication of unfinished work.
- Delete a View: select the desired view to remove from the drop down list and click on the Delete button.
The Transfer Command
This enables you to select and Transfer a View from a given owner (the user with which the view was created) to another user.
![]()
The field labels are self-explanatory - simply fill in the form and click on the Ok button to execute the command.
Transferring a view can be very useful, as it allows you to:
- pass unfinished work to a colleague to resume,
- send your work for validation to a supervisor,
- unblock a situation where an absent user has left locked items which another user urgently needs to access.
Displaying Views
You may wish to monitor the progress on your work and check how your changes will look like in the Portal.
As a good practice, you will also want to give your changes a last look before publishing your work.
To do so, return to the header of the NOP and click on the View button:

This opens the View selector, from which you will set the view to display in the Portal:
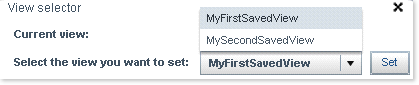
For this example, we have selected for you the view MyFirstSavedView and clicked on the Set button. It is easy to check which is the view currently in use by clicking again on the View button in the header.
Continuing our example, this is how the View selector would now look like:
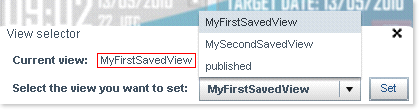
This tells you that the current view is indeed MyFirstSavedView (in a red border above) - and enables you to either opt for another view, or revert to the published view and restore the Portal in its initial state.
This step is very important to perform a visual check of your data.
Another important step to take before publishing is now to Validate and align you changes against the system - this is detailed in the Validate and align section.